Places to see!

Tuesday, September 24, 2013

One of those days!

If your anything like me, sometimes you just don't feel like doing anything. You want to sit at home on the couch, watch Food Network and take time just to relax. And no matter how long you spend on the computer looking at different exercises, healthy foods, and other healthy things, your not helping yourself.

Today has been one of those days. I was so exhausted when I woke up this morning, I almost fell asleep in the shower! Did manage to grab a quick breakfast to eat on the way to class. (Go me!) But, I got a headache in class and it just would not go away! By the time I got home it was so bad I didn't want to move. So honestly, I didn't. My fiance went and grabbed us lunch, and not long after I was sound asleep on the couch! I'm happy to say that after my nap my head is better, and here I am typing away.

Now I'm going to be honest, I have days when I don't wanna do anything and I feel just fine. I just simply don't want to do anything. And I no we all have those days. When we have those days, sometimes all we need is the motivation to do something. And sometimes, you can spend the day getting motivated and it will last you a while. And that is the best kind of motivation, the kind that stays with you.

Have you ever hear of TED? If not I strongly suggest you check it out! I first heard about it in one of my classes, as there are some great motivational and helpful teaching videos. But I wanted to explore, and I found wonderful fitness and health videos as well! Here are a couple of my favorite.

Jamie Oliver -- Teach Every Child About Food -- GREAT Video!


A.J Jacobs -- How Healthy Living Nearly Killed Me

And these are just two videos! There are so many more out there, even just on TED there are hundreds more. Find your own motivation, find what motivates you, it WILL be different for every single one of you. Find what works! 


Monday, September 16, 2013

Zucchini Carrot Muffins

Even as I'm writing this post, I'm sitting here enjoying one of this delicious muffins. I can not describe how good these are! They are super moist, just sweet enough, great for desert or breakfast, and you don't taste the vegetables! And even if you have a picky child, or fiance like me, the aren't going to know there are veggies in it unless you tell them. Really, have them try it first then share that it's good for them.

I actually found these muffins on another site, and I just knew I needed to add my own twist to them. And I even managed to make them even healthier and pack more veggies into it. To start simply mix all the dry ingredients together. I don't sift them or anything like that. Simply dump them in a bowl and mix away. Feel free to lessen the amount of sugar, or use a sugar substitute.


Now, you may notice there aren't any nut or oat chunks in my dry mix. I actually take the time for one more little step. I place my oats and nuts into a mini chopper, or food processor, and lightly chop them up. I personally don't like the texture of the whole oats and nuts in my muffin. You can also use just about any nut you have on hand. I've used walnuts, almonds, and pecans. All are very good. I would stay away from peanuts though, as they have a much stronger flavor.


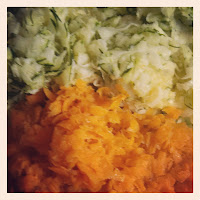
Now mix the wet ingredients. Here you'll notice a very pale, eggy color. This is because I used applesauce in this batter, not apple butter. My favorite thing to do is to add both applesauce and apple butter. They each have their own unique flavor and really help to sweeten the muffins. Next grate your veggies. Use a hand grater or a food processor. My tip to you if using a food processor is to grate using your grater, but then to chop it up a bit more with your blade, just for 3 seconds or so. I've noticed the grated pieces can be a little on the larger side.


Yes, all those veggies go in the muffins! Can you believe that? Your family is sure to get their veggies for the day. Mix in the veggies and the raisins to your wet mixture. You'll end up with a goopy mixture that looks like this:


Your almost done! Add the dry ingredients into the wet veggie mix. I just use good ol' fashion elbow grease, but a mixer would work fine as well. I normally add the dry ingredients about half at a time. This way I know everything is incorporated very well. 


Once your dry mixture is incorporated, spoon your batter into greased muffin tins. Now the first time I made these I tried to use paper muffin cups. Boy do the muffins stick to the cups! I really recommend just spraying the tin and adding the batter. (Which is what I've done ever since,and it works perfectly) I get about 24 muffins every time I make these, and fill the cups about 2/3 full.


Bake the muffins for about 20 minutes in a 350 degree oven. Test with a toothpick, when they are done a toothpick should come out clean. Cool on a wire rack, or enjoy warm. These are great plain or with a touch of spray butter! Now, here comes the recipe. You have made it this far--so don't run away when you see the ingredient list. Chances are you have most, if not all, of them in your pantry!


Zucchini Carrot Muffins
adapted from EatingWell

1/2 Cup Oats
1/4 Cup Walnuts, chopped
1 1/2 Cups All Purpose Flour
1 Cup Whole Wheat Flour
1 1/2 Cup Sugar
1 Tbsp Baking Powder
1 1/2 Tsp Cinnamon
1 Tsp Salt
2 Large Eggs
3 Large Egg Whites
1/2 Cup Apple Sauce or Butter
1/4 Cup Canola Oil
1 Cup Grated Zucchini
1 Cup Grated Carrot
2/3 Cup Raisins

Preheat your over to 350 degrees. Spray your muffin tin with non stick spray. Combine all dry ingredients in a medium bowl. Be sure to really incorporate all the ingredients. In a large bow, combine the eggs, applesauce or apple butter, . Grate your zucchini and carrots, if you have not already. Then mix the zucchini, carrots and raisins into the wet mixture. 

Combine half of the dry ingredients with the wet ingredients. Fully incorporate the two together, then mix in the remaining dry ingredients. Spoon into greased baking tin, about 2/3 full. Bake for approx. 20 minutes or until toothpick can be inserted and come out clean. Remove from tin and cool on a wire rack. 

Freezer Meal-- After baking flash freeze on a baking sheet. Transfer to freezer bags. To Eat: Take out to thaw, or heat for 30 - 40 seconds in the microwave. 

Calories-- 120    Fat-- 3g  Carbs-- 21g   Sugar-- 12g    Protein-- 3g 
* Nutritional Info will vary. Depends on brands and ingredients used.

Thursday, September 12, 2013

What's For Lunch? Healthy Options

I know its been a while since I've posted so I'd like to give you all an update! I'm still chugging along with the eating healthier goals I have. I still haven't quite done as good as I should be. I'm back to college and have super busy days becoming a teacher. So I will admit its been very hard to stay healthy. I've been so busy, its just so much easier to just grab something quick and go.

I've noticed my biggest issue is healthy lunches. This week, I've done absolutely terrible with my lunches. I've had single serving frozen pizzas, shrimp poppers, and not so healthy sandwiches. Now I will say yesterday for lunch I had Subway, and they can be a wonderful resource for healthy lunches. Just really watch your condiments! I think it's about time to go for this thing fully. So I've compiled some super recipes, both quick and healthy. No more excuses for fast food or unhealthy lunches! Wanna know something really cool? All these wonderful recipes are under 500 calories!


Caprese Salad Pita Pockets

Greek Pasta Salad

Carrot & houmous roll-ups


*Disclosure- These recipes are compiled from all over the web. They are not my own recipe and I do not wish to take credit for them. Each caption will link you to the original site and recipe.

I hope these recipes give you a few ideas and get your brain flowing with a few healthy alternatives to lunch! Not your style? Pinterest has an "endless" supply of great healthy meals! Leftovers from dinner are always great the next day for lunch as well.

Saturday, August 24, 2013

Week One- Accomplished!

Happy Saturday Everyone! It's my last big weekend of the summer, my fiance and I are moving into our college apartment Wednesday. And soon after, its back to classes and school work. So I decided its finally about time I actually stuck to my plan of getting healthy.

I finally realized that its up to me. No one can change my body for me, and no one can make me do it. The reality of it is- I have to be willing to change me, and I have to want to change for me. What I mean is if your not ready to commit 100% your never going to reach your goals, and well, you'll have to start all over again! I know I'm tired of starting over! I figured I'd start before I went back to school, hoping to change some of my basic habits so I'm not doing it when school starts!

So what exactly am I talking about? Well I'm starting my journey to a healthier life. I've started eating better and really focusing on my portion sizes. And I'm happy to say I've made it through week one. Now this isn't to say I did perfectly, because I promise I didn't. Just last night we had a little celebration for my fiance finishing his summer job, and well the food was so terrible for you. But the big thing is, I'm back on track today.

How am I doing it you might ask? I wish I had a magic button I could tell you to push, or a fail proof "diet" plan, but honestly I'm doing it my way! I'm simply replacing junk food with healthy food and I'm starting a walking plan when I get back to school.

I'm here to tell you, YOU can do it too! I just want to give you a few pointers and tips that I've looked at before starting my journey.

1) "Eating healthy is too expensive." I'm here to tell you its not! If I can do it on a college kids budget, I know you can do it too! Here is a great article that really puts things into perspective. It may surprise you how much healthy food you can get at the store for those 4 fast food meals you (and your family) were going to have for dinner.

2) "Do your research." No one wants to sit for hours and hours doing research about something. But it is a good idea to develop some sort of a plan. Take the time to find some healthy recipe alternatives to your favorite foods. You may also find some great tips! Such as how food journals significantly increase your rate of success!

3) "Find a program that works for you!" Just because there is this "amazing" diet program that your best friend did and lost 20 pounds doesn't mean its going to work for you. There are so many resources out there to help you on your journey, find one that is right for you! I'm using a free online site called SparkPeople. It is a really wonderful site that provides tons of resources in one spot! It has everything- food tracker, exercise tracker, recipes, calorie calculator, teams, support, workout videos and more! It's certainly something to look into, maybe it will work for you!

4) "Drink more water!" For me this is super easy. I already drink tons and tons of water. Its my drink! (I'm not crazy I promise, but I'll take a cold glass of water over a cold soda a-n-y day!) I actually just bought this really cool water bottle as part of my back to school supplies. But the cool thing about it (other than its pretty turquoise color) is it has ounces marked on the bottle. So you can easily tell if your getting your 8 glasses (64 oz) of water a day! Now I got the 32 oz version of this bottle, and easily drink 4 bottles a day. But if your like my fiance and think that is just too much water, stick to just 2 bottles a day!

The only other thing I did was really prepare for my journey. I prepped my food. Yes, I took the time to chop veggies and get snack ready. And honestly, it is more than worth the time! Its so much easier to grab a healthy snack now, since they are just as convenient as the less healthy options. And really, you can do the prep for the whole week in just an hour or two. But I also spent a few hours making some healthy freezer foods! I made chicken and spinach taquitos as well as zucchini carrot muffins. Boy are they good! I promise, the recipes are coming!

I know this post is long, but I really hope it helps! If it helps just one person, it was worth it! I'm going to continue to share my journey with you, but I'd love to hear yours as well! Feel free to share your own tips, we can all help each other!

Wednesday, June 12, 2013

Storing Fruits and Vegetables

For those of you who may not no, I like many people, want to get healthy and loose weight. Which I am finding this topic to be much easier to talk about than to actually do! One of the hardest things for me is eating right! I just love food! I've learned there is nothing wrong with that, I just have to be better with what foods I choose to eat.


 One thing I just cant stand is how much stores are charging for fresh fruits and vegetables. And if your anything like me, they go bad before you can eat them all. Who wants to waste food or money? I know I don't. So today, after so research and testing, I've created some tips for the best way to keep those fruits and veggies their best as long as possible!

Refrigerator Storage Tips
  • Keep produce in a perforated plastic bag, in the produce drawer. You can make your own perforated bags by slicing holes in the bag with a knife. Be sure to space them out, such as a grape bag.
  • Keep fruits and vegetables in separate drawers. The ethylene build up from different produce will cause spoilage. 
  • Keep herbs upright in a glass of water, just like you would flowers in a vase, and cover with a plastic bag. Snip off the ends before placing them in the water.
Keep Separate
  • Potatoes and Onions
  • Apples and Bananas
  • Apples, Figs, Apricots, Tomatoes, Honeydew, and Cantaloupe should be stored separate of other fruits. 

Check out this chart! (Took a lot longer than expected... but its well worth it!) Here are directions for storing specific fruits and veggies.


I hope you enjoy this post! Let me know if I forgot something, or if you have some tips or tricks of your own!

Tuesday, March 5, 2013

Reusable Bags- Are you choosing the right one?

So today's post was not planned, in any form of the word. It actually came about from me wondering through some Facebook business pages. I feel it is very important to give you a little bit of information that will keep your family safe!

There are so many companies starting to offer reusable snack bags. I just wish they took the time to research the materials they use before developing a product. Today I saw numerous bags being lined with PUL (Polyurethane Laminated Fabric). o what is the big deal you ask? Well PUL is not, I repeat is not, food safe!

Don't get me wrong it has its uses. PUL is great for cloth diapers, actually its excellent. And its great for other crafts and such! First I would like to point out that there is a wood stain called polyurethane. And let me tell you, if you stay  around it too long it can induce on heck of a headache! But I digress, lets take a look into PUL:
  • The Process- Basically what happens is the PUL is applied to the surface of more porous materials (fabrics), such as cotton or polyester. This application is done through heat bondage where a single layer of PUL is applied to a layer of fabric using strictly heat. While this application leaves the fabrics with a waterproof layer and still provides flexibility, it contains many chemicals. Also due to is heat bondage in some cases the fabrics may start to "un-bond" or separate.
  • Toluene Diisocyanate, one of the main chemicals used in the process. This chemicals is actually classified as "highly toxic!" This chemical is used in the production of all polyurethane products. Check out this page from the EPA that lists the effects of this chemical, cancer is even listed! Or this chemical safety card from the CDC.
  • "According to the National Institute for Occupational Saftey and Health's International Chemical Safety charts, this substance is possibly carcinogenic to humans." Read more HERE. (Sources are listed there as well.)
  • I'm sure there are people out there who will tell you PUL is safe for reusable bags as long as you put the laminate side away from food. But honestly, you really think that will solve the problem? The two materials are heat bonded, when they heat up the chemicals found in the PUL is sure to find its way into the porous fabric. With so many health risks from this material- just don't risk it!
So, keep the PUL for other crafts and home projects. Its great to upholstery dinning room chairs, to make high chair liners, or even baby bib. Or heck, save tons of many by using cloth diapers! Some outdoor clothing is made using PUL as well as many shower curtain liners.

I don't know about you, but I don't want my food anywhere near this stuff! So what now? What kinds of reusable bags are safe for food, and your family? Choose bags with cotton or nylon (rip-stop only) linings. Both of these fabrics are proven to be food safe. If you are looking for a more stain and water resistant lining, choose nylon. If you are looking for a more "all natural" product go with an organic cotton.

Still need some more information? Leave me a comment or send me an email! I'm happy to help you make a safe and healthy choice for your family!

* Please note- The above statement is my opinion, I have sited facts that I have found over numerous hours of research. I have also had phone calls with manufactures  and suppliers of these products. The statements above are correct to the best of my knowledge, I have done everything in my power to ensure this.

Thursday, January 31, 2013

Surprise Goodie Bag Giveaway Winner!

First of I want to start out by giving a big Thank You to everyone who participated! This giveaway was a huge success, which wouldn't of been possible without all of you!

And the winner is Dayna Kinard! Rebecca Guthrie! Congrats!

Please look for a message from us on Facebook with further instructions (in your OTHER tab).  *If no answer is received within 48 hrs a new winner will be drawn. Due to Facebook's rules I can not post the name on Facebook.

So for all of you curious about the prize... you'll have to wait just a bit longer! I want to ensure the winner gets her prize before I let you all know what it is. But I promise it's full of some great goodies! Here is the sneak peak photo again. Thank you again to all those who participated!


Check out another giveaway I'm hosting HERE.

Sunday, January 27, 2013

Felt Food Tutorials

My new Pita Pocket from MilkFly
Who knew felt food has become so popular! Felt foods are great alternatives to plastic foods. Plus they are just as fun and they are environmentally friendly!

I have been using felt food in my products photos for about a year now and I love it. I just got a new pita pocket in and I couldn't be happier with it. I choose to buy this pita pocket, from MilkFly, as I was so impressed with her work! I was shocked when I saw the prices, so she actually offered to trade with me. (Please don't bombard her with trades! lol I'm not sure if this was just a one time thing.) But not that I have recieved her products I would certainly pay the $39, with shipping, she wanted for this! Her shop is amazing and I really think you should all check it out!

Now I felt kinda silly buying felt foods as I knew I could make them myself! I just didn't know how. So I have compiled a list of FREE felt tutorials! There is a free tutorial out there for just about anything you can think of! Now I did make myself some carrots. I must say I impressed myself as I didn't use a pattern or tutorial.

For those of you who think you need a pattern or tutorial here are some links to great ones! Very simple too, even if you've never sewed a day in your life! Just click the item or shop and away you'll go.

FREE Tutorials
Craftiness Is Not Optional (Tons of Great Tutorials!)
Purchasable DIY Patterns
Maybe your not so crafty? Or not the best at sewing... Well don't fear! Plenty of folks sell fabulous felt food. 
Photo From: Bugga Bugs- Click go to page!

Already Made Felt Food


I'm sure these lists could go on and on! Have a favorite tutorial, pattern, or shop that I missed? Share it in the comments! Check Out Pinterest for More Great Felt Food Tutorials! 

Wednesday, January 23, 2013

Freezer Cooking Part 1 - Just the Basics

Its amazing how you can set your mind out to do something and then life steps in the way! I was determined to get the first part of freezer cooking published Monday. And as my luck would have it some unforeseen events decided it was time to make an entrance! So without further a due, here is Freezer Cooking Part 1.

*This is gonna be a long post! Eventually I'll post more detailed recipes with more pictures. And as I do I'll shorten this post by adding links to recipes instead of having the entire recipe here!*

Freezer Cooking Part 1 - Just the Basics

This first part of freezer cooking is meant to familiarize you with freezer cooking. Hopefully this post will help you ease into the process and get ready for your first big cooking day!

What better place to start than with, "What is freezer cooking?" Well simply freezer cooking is meant to make cooking healthy meals easy and quick for you. The key phrase is "quick for you," because often freezer cooking is work for your crock pot! You simply prepare the meals and stick them in the freezer, then pull them out when you want to cook them. Its best if you pull them out the night before and stick them in the fridge, but its not the end of the world if you don't! Imagine how much money this can save! No more having to order dinner or go out if you forget to pull out something. And sometimes its just much easier, especially with a busy schedule!

Now I'm going to share one of the simplest and cheapest "freezer meals" out there. Part 1 is made to be simple so all of the recipes shared today are quick and require little work. Its a great step up to ease you in!

Practically Free Veggie Stock

Yes, I said practically free! This is not really a freezer meal, but it does have a home in your freezer. To make your veggie stock, start saving all of your veggie extras. Save those green onion ends, lemon rinds, onion peels, potato skins, squash skins, carrot peels, everything! Store these extras in a gallon freezer bag in your freezer. When it gets full you get to make stock. (As you can see below I saved everything! Squash ends, celery leaves and ends, lemon rinds, green onion roots, celery bottoms, extra red pepper potato peels and regular onion skins.)

Add the contents of your veggie bag into a large stock pot. Fill with water ensuring to cover all of the veggies. Let simmer for 1-2 hours, the longer the more flavor you will get into your stock. After cooking turn of the heat and allow to cool in pot. Strain out your liquid and throw away your veggies. Now you can freeze your stock. 

To Freeze: Pour into desired container. I like to use ice cube trays, muffin tins and snack baggies. The ice cubes of stock are great to add to skillet dishes and the muffin size are great when a soup or chili needs a little extra liquid.  When using freezer bags, lay them on a cookie sheet and place the whole sheet in the freezer. This will let your bags freeze flat for better storage. 

Crock Pot Sloppy Joe's

  • 1 lbs Lean Ground Beef
  • 1 lbs Lean Ground Turkey
  • 1 Large Onion, chopped 
  • 1 Small Can Tomato Paste
  • 2/3 Cup BBQ Sauce
  • 1/2 Cup Ketchup
  • 1/4 Cup Soy Sauce
  • 1/4 Cup Worcestershire Sauce
  • Pepper to taste
Split ground beef, ground turkey and onion evenly between two gallon size freezer bags. In a bowl combine tomato, BBQ sauce, ketchup, soy sauce and Worcestershire sauce. Divide between both bags. Close the tops of the bags and using your fingers mix everything together. Open and squeeze out any extra air. Place bags in freezer. To cook: place in a crock pot on low for 6-8 hours. You may feel the need to add stock if the mixture is not sloppy enough! 

Beef Burgundy 


  • 2 lbs Beef Stew Meat (Or you can cube your preferred choice of beef)
  • 2 Cans Cream of Mushroom Soup
  • 2 Cup Milk
  • 6 oz Mushrooms
  • 3/4 Cup Burgundy or Red Wine
  • 1 Pouch of Onion Soup Mix
  • Salt and Pepper
  • Dash of Worcestershire 
Add one lb beef to each of two freezer bags. Combine the remaining ingredients in a bowl. Separate between both bags, evenly as possible. Place in freezer on flat surface. To cook: Place in a crock pot on low for 6 to 8 hours. Serve over rice or noodles! 

Meatloaf
  • 1 lb Ground Beef
  • 1 lb Ground Turkey
  • 1 lb Ground Chicken
  • 3 Eggs
  • 1 Cup Breadcrumbs
  • 1/2 Cup Parmesan Cheese
  • 1 Medium Onion, chopped (or diced if you have picky eaters!)
  • 2 Tbsp Fresh Parsley (or 1 tbsp dried)
  • 2 Tbsp Salt
  • 2 Tbsp Pepper
Mix everything in a big bowl! Meatloaf is one of the easiest things you can make for the freezer, no need to cook before you freeze it! Shape your meat mixture into desired loaves. I like to make a big loaf (in case we have company), and then I love to make personal size meatloaves. For mini/personal loaves using a muffin tin is a great idea, or you can use a bar pan (like the ones you make Twinkies in).

*You can add whatever other spices and sauces you'd like! BBQ sauce is a great addition, just add 2 eggs and about a 1/2 cup bbq sauce. Or go for an Asian twist adding soy sauce, green onions, oyster sauce or yum yum sauce are all good. 

Crock-pot Beef and Broccoli
  • 2 lbs Beef (Such as chuck roast) sliced thin
  • 1 Large Onion, sliced
  • 1 & 1/2 Cup Beef Broth
  • 1/2 Cup Soy Sauce
  • 1/3 Cup Brown Sugar (Dark is better, but light will work!)
  • 1 Tbsp Oyster Sauce or Sesame Oil
  • 2 Tbsp Garlic, minced
  • 3 Tbsp Cornstarch
  • 1 Bag Frozen Broccoli (You can use fresh too!)
In a bowl combine broth, soy sauce, brown sugar, oyster sauce, and garlic. Place your beef and onion in a large freezer bag (or two if your cooking for less). Add your sauce over the beef and onions. Place in the freezer until your ready to cook it. 

To Cook: Place bag in fridge the night before you wish to cook, this will allow a little time for the liquids to thaw. Empty freezer bags contents into your crock pot. Cook for 4-6 hours, remember to check every so often. As your beef cooks it will become more tender, you do not want it to shred. About 30 minutes before its done to your liking get a small bowl, mix cornstarch with 4 tbsp liquid from crock pot. Make sure to mix this well. Add back to your crock pot, also add the broccoli. I used 4 small heads of fresh broccoli for mine. Serve over white rice.

I used this Recipe as a started and adjusted to fit my family and freezer cooking needs.

That is it for this edition of freezer cooking. As I said I'll slowly start to add the recipes to the blog and switch out these for links. Who knows, maybe I'll even add a few recipes! I hope you all enjoy and I look forward to hearing about your freezer cooking experiences!

Wednesday, January 16, 2013

Giveaway- Win a Surprise Goodie Bag!

Yup that's right, I'm hosting a giveaway! And it only takes moments to enter!

First off CLICK HERE to enter. Make sure you follow the rules or else your entry won't count, and that is not something I want to do! So just follow the rules (they are also posted right below this just in case).

Giveaway Rules:
1) You must enter on the link above! Any entries posted anywhere other than on the above link will not count.
2) You must "like" the Aprons N' Bows Facebook page, again your vote will note count if you do not.
3) You must "like" The Green Haven's Facebook page, as that is where the giveaway is taking place. No like, no vote ; )
4) You must leave a comment saying you voted! (This is your actual entry!)

Enough about the rules! What will you win!? Well that's a secret! But here's what I can tell you: You will receive a goodie bag (package) full of fun surprise items from my shop. And you will be the first ever person to receive a new not yet released product from my shop! This item has been in the works for a little while and will be in my shop for purchase in February. So if you win you will be the first person to receive on of these! Oh and did I mention there will be multiple goodies? Well there will be! You can count on at least 3-4 items (but there will probably be more!!!).

Okay I'm wishing you all the best of luck! UPDATE: Freezer cooking post is in the works! Look for it on Monday, January 21st!

Friday, January 4, 2013

A Little Overdue

Today as I was fixing my lunch I realize I never took the time to introduce my self and my little family! What was I thinking!? So today's post will be an introduction to the people behind the names.

But first... Happy new year everyone! Here's wishing you all a wonderful, prosperous new year. Did you all make resolutions  I know I did, and so far, I've stuck to them (I know that's not saying much 4 days into the new year... but you gotta start somewhere right?). My personal resolution is to not only loose weight, but to be healthy. For me its not just about one or the other. What is so good about loosing weight if your not healthy enough to keep that weight off? This year I've come up with goals and such to help me along the way and even became active on a wonderful site called Spark People. (More to come on them in a later post! But its a great tool, and its FREE!)

Okay enough about that, its time for introductions! First up, little ol' me. I'm the one behind the blog and the shop, the one who some how manages to do  it all (I have yet to figure out how!).

Yup that's me! That was Christmas morning at my mom and dads. It's one of the most recent pictures I have of myself, so I figured why not! Anyways, a little about me. I'm currently enrolled in college, I go to Frostburg State University (FSU). Here I'm majoring in Early Childhood and Elementary Education, with a minor in psychology. I have my own business, The Green Haven, in which I design and sew eco friendly and reusable products.

I do all the cooking, which I don't mind, and that's probably a good thing! Let's just say my fiance is not the best equipped for cooking, I just recently taught him how to make pancakes!

Now on to the mysterious fiance! He does have a name, which I do know believe it or not, and its Brian. But if you do see me refer to him by name I highly doubt you'll see Brian, to everyone he is Bubba! (Well to me he is Bub or bubby, but hey you get the idea!)

That's him on Christmas morning too! And if you look beside him your are not mistaken. Those are remote control cars, and actually they were one of his favorite presents. He is also at FSU, but he is majoring in Wildlife or something like that. I can never remember what the major is called, but basically he is going to school to be a park ranger, or a DNR officer.

Last but not least are our two furballs. We have two cats, who happen to be brothers, that will be 2 years old Feb 27th of this year. And yes they are curled up in the bathroom sink, I have no idea why! The grey and white cat is Felix, he is mine and boy do you know it. He will only lay down on me, he has to climb in bed and have me pet him before we go to sleep, he hates in when other pick him up, and if he can't find me he runs around like a lunatic until he does, and it goes on and on. The other cat is Austin, and he is quite the opposite! He is the most lovable cat on this planet. As soon as the front door opens he is there to investigate. He loves to rub up on your legs, and sit in your lap, and if you stop petting him he will nudge you until you start again!

Well that is a short and sweet introduction to our little family. I hope you all enjoyed! Oh an for those of you looking for the first edition of freezer cooking, look for it within the next week!